Propagation
The main methods of propagation for home gardeners are seed, division and cuttings.
SEED
There is a great deal of information available on propagation of native plants from seed. Growing Australian Native Plants from Seed (by Hepburn Shire local, Murray Ralph) is a handy book. The ANPSA (Australian Native Plants Society, Australia) website is an extensive online reference.
Many native plant species can be sown and grown readily from seed with no pre-treatment. Generally, the most success will be had in the warmer months (spring-summer-autumn).
Other species require specific conditions or pre-treatment before sowing.
Examples:
Hot water treatment
Some plants, particularly in the Fabaceae (Acacias and pea-flowering plants) family, have a hard seedcoat which can preserve the seed for many years in the soil. To instigate germination in these species, a common method is to poor boiling water on the seed and allow to soak. Other methods include nicking or scarifying the seed. Acacias (wattles) are generally an easy genera to grow after treating with boiling water and are a good place to start for those new to propagation.
Cold stratification
A number of species, particularly those that occur in elevated regions such as the Central Highlands, require a period of cold before they will germinate. This can be overcome by sowing the seed in autumn and overwintering. Alternatively the seed can be placed in a jar with moist potting mix and refrigerated for a month or so. Some local species that require stratification include Sweet Bursaria, Tree Violet and Prickly Currant-bush.
Smoke
Many plants require, or germinate more evenly, after exposure to smoke. This is particularly the case for many grassland species (an environment where fire is naturally more prevalent). Smoke water and smoke vermiculite contain the necessary compounds to stimulate germination in such species. Seed can also be directly exposed to smoke.
DIVISION
Division is often the easiest and fastest way to make new plants. Plant division is where a part of a plant comprising both foliage and roots is separated from the source plant. Many creeping plants such as Kidney Weed (Dichondra), Native Violet (Viola hederacea) and Matted Pratia (Lobelia pedunculata) are readily divisible. Many tussock-forming and strappy-leaved plants such as Dianella species, Carex species and Lomandra species are also good candidates for division. Larger divisions and hardy species can be divided and immediately planted out into the ground. More delicate or fine divisions are best placed in pots and put somewhere out of direct sunlight and wind.
It is even possible to divide species with taproots such as Geranium and Pelargonium species. In this case it is best to select plants that have strong growth from opposite sides of the taproot and carefully divide the taproot with a sharp implement. The separate halves of the plant should then be treated as per cuttings (i.e. potted and placed in high humidity).
CUTTINGS - dot points
1: Choose healthy material- Nutrient deficiencies and pathogens will be compounded in the cutting. There is a balance to be struck between very new growth and old growth. Very fresh growth will wilt quickly and is unlikely to survive long enough to strike. Old material is less likely to produce roots at all. Cutting length will typically be around 10-20cm long.
2: A good pruning technique will always involve cutting just above a node, never leaving a stub. This ensures the health of the parent plant. Then shorten cutting to just below a node and prune off one half to two thirds of leaves starting from the base. Too many leaves can cause too much water loss, too few leaves and the plant will not have capacity to produce sufficient carbohydrate for root growth.
3: Rooting hormone encourages faster and more consistent striking of cuttings. I use a gel rooting hormone as I don’t like the idea of breathing in fine powders. Some plants will strike readily without rooting hormone and there are recipes online to produce natural alternatives (willow water). If using an artificial gel or powder first empty a small amount into a suitable vessel so as not to contaminate the bottle. Dip cutting to approximately 10mm.
4: The medium used for cuttings must be coarse or open to allow oxygen to circulate, prevent rot and promote root growth. I use 100% medium grade perlite. This perlite is relatively coarse allowing for oxygen to circulate, but is also porous and so retains moisture. Perlite is also very lightweight and makes for easy removal of cuttings once rooted. Dry perlite is dusty, wear a mask or moisten before use. There are many other recipes for cutting mediums online.
5: Cuttings can be placed relatively densely in chosen containers. Anything from a seed tray to a 6” or 10” pot can be used for cuttings (although I tend to cut large pots down to reduce use of medium and allow for more air flow). If perlite is not watered into tray you may be able to gently push cuttings straight into mix. Once watered the perlite settles down somewhat, so it is best to dib a hole with a dibber (e.g. stick) before inserting cutting. Once cuttings are in mix, give them a gentle watering.
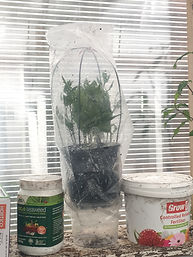
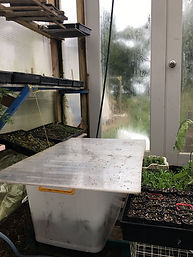
6: A humid environment for herbaceous and semi-hardwood cuttings is a must! This can be attained by putting wire hoops in the pot and placing a plastic bag over the top, or by placing in a plastic tub, fish tank or similar with a cover placed on top. The cutting container should then be placed in a warm, light-filled place but with no direct sunlight (you may get away with some direct sunlight in winter, but cuttings will cook in the warmer seasons). I rarely if ever water cuttings in the cooler months. A very occasional misting or watering may be needed in warmer months. If there is condensation on the bag or container walls humidity is typically adequate.
Above: Plastic tub used to provide humid environment (left), wire hoops and plastic bag for humidity (right).
7. Depending on the species and the season, cuttings may be ready to pot-on in anywhere from 3 weeks to several months (or even a year!). As a starting point, some examples of species local to the region that are readily able to be propagated from cuttings include:
Herbaceous plant examples -
Brachyscome multifida, Chrysocephalum apiculatum, Chrysocephalum semipapposum, Mentha australis, Mentha laxiflora. Persicaria decipiens, Senecio (all species), Xerochrysum viscosum
Subshrub and shrub examples -
Correa glabra, Goodenia ovata, Tetratheca cilliata, Prostanthera lasianthos (can be slow), Spyridium parvifolium, Solanum laciniatum / aviculare, Olearia species, Cassinia species, Ozothamnus species.
8. It is generally best to wait until there is evidence of root growth at the base of pot before disturbing cuttings, although they can be checked prior if excitement gets the better of you. When checking or repotting cuttings they can be gently lifted from the medium with a narrow implement (e.g. a butter knife or pencil). If not ready set them back in the medium.
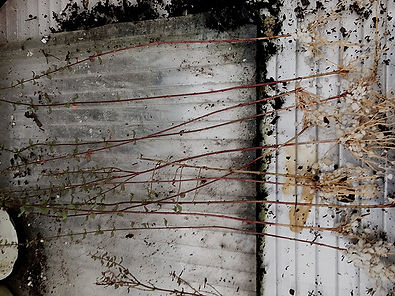
Above: Some very long Tetratheca cilliata cuttings ready for potting-on. These are probably around 30cm long as I felt the wider diameter stems near the base would best produce a healthy root system and didn’t want to sacrifice the growing tip. Once potted they should produce new growth at lower nodes.
9. Cuttings should be potted into a container of sufficient width to accommodate the root system. A well-drained premium potting mix is generally fine unless growing Proteaceae (e.g. Banksia, Grevillea, Hakea) which require a native (low phosphorus) mix. The pot should be filled someway (perhaps halfway, depending on pot and cutting size), then the cutting held inside the pot. Additional soil is then gently filled in around the roots and the base of the stem, gently firmed and watered in. Forcing cuttings into dibbed holes or small containers is not recommended, snapped or upwards facing roots can spell the end for the plant.